 图新地球PythonAPI
6.1Excel转KML插件
本插件的核心功能是解析excel中的坐标及字段信息,输出kml格式的文件,支持配置要素名称,拼接excel字段作为要素的属性,并展示了html配置属性对话框样式的过程。
通过本插件可了解到:
- 熟悉使用tkinter库构建界面的过程
- 熟悉使用openpyxl库解析excel文件的过程
- 点要素(marker)的构建过程(图标等风格)
- 属性对话框的html样式配置过程
- Kml文件的保存过程
插件界面:

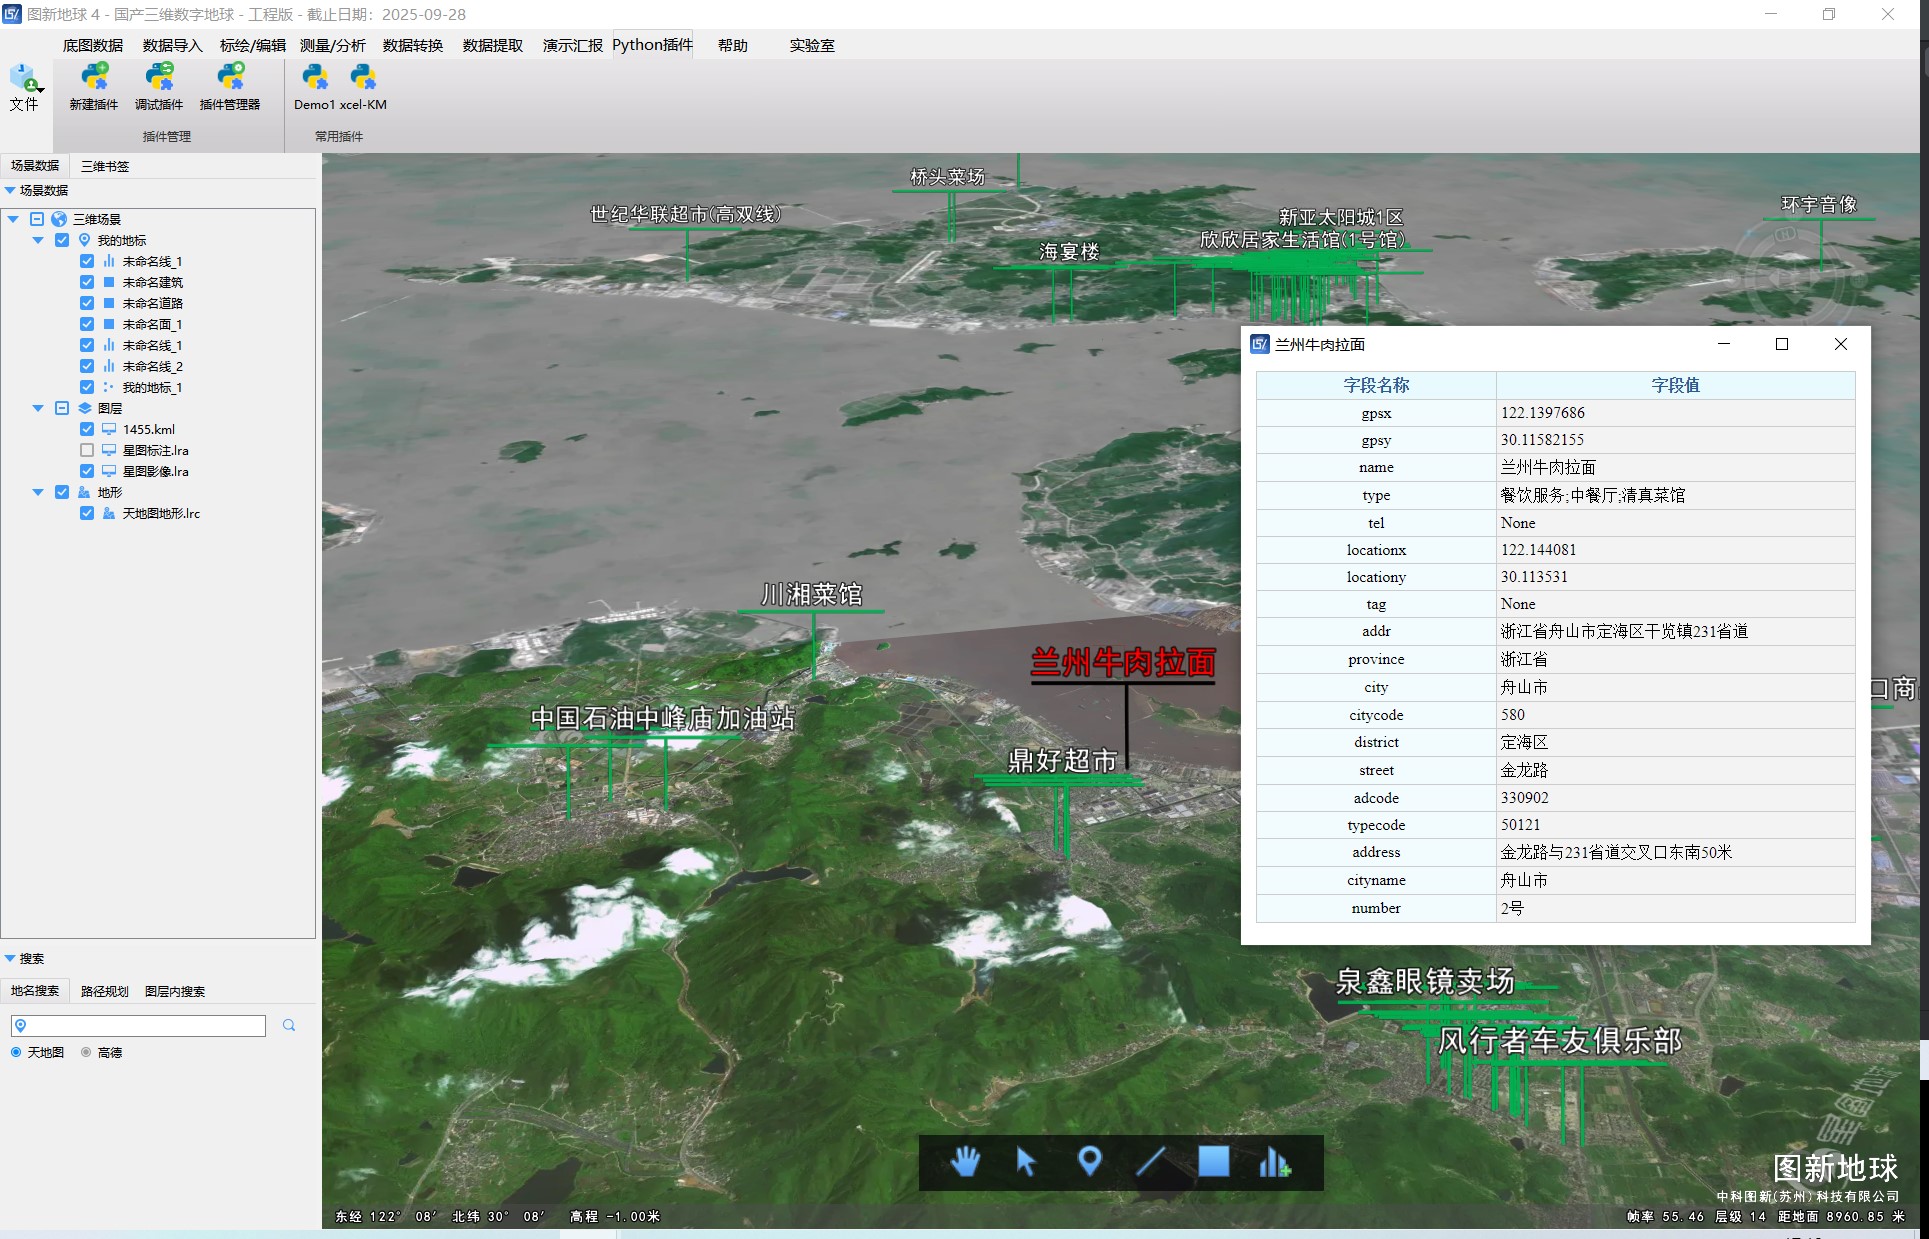
转换结果:
源码及示例数据下载地址:
注:示例代码并不是完整的插件,需要按照开发环境的构建流程,安装对应的依赖包。
6.1 tkinter界面构建
界面主要涉及窗体(TK)、标签(Label)、输入框(Entry)、按钮(Button)、下拉列表(Combobox)、复选框(CheckButton)6个控件。
布局采用了最简单的绝对定位
界面构建代码如下:
python
# 对话框界面对象定义
top = tkinter.Tk()
# 修改窗口标题
top.title("Excel转KML")
# 修改窗口大小
top.geometry("800x600")
top.resizable(width=False, height=False)
left_padding = 20
top_padding = 20
# 选择kml文件标签
label_select_excel_file = tkinter.Label(top, text="选择excel文件")
label_select_excel_file.place(x=left_padding, y=top_padding)
# 显示路径的文本输入框
url_value = tkinter.StringVar(value="请选择excel文件,此处显示其路径")
entry_url = tkinter.Entry(top, state="disabled", textvariable=url_value)
entry_url.place(x=left_padding + 100, y=top_padding, width=550)
# 选择kml文件的按钮
button_select_excel_file = tkinter.Button(top, text="...", command=select_excel_file)
button_select_excel_file.place(x=700, y=top_padding - 5, width=50)

# 一个信息标签用来显示kml文件的基本信息
label_excel_info = tkinter.Label(top, bg="#D7D7D7", text="此处将显示excel文件的基本信息", anchor="nw")
label_excel_info.place(x=400, y=60, width=380, height=450)

# 名称所在列
combobox_y_pos = 30
combobox_step = 60
label_name_col = tkinter.Label(top, text="名称所在列:")
label_name_col.place(x=left_padding, y=combobox_y_pos + combobox_step)
combobox_name_col = ttk.Combobox(top, state="readonly", values=["未选择"])
combobox_name_col.place(x=left_padding + 100, y=combobox_y_pos + combobox_step)
# 经度所在列
label_lon_col = tkinter.Label(top, text="*经度所在列:")
label_lon_col.place(x=left_padding, y=combobox_y_pos + combobox_step * 2)
combobox_lon_col = ttk.Combobox(top, state="readonly", values=["未选择"])
combobox_lon_col.place(x=left_padding + 100, y=combobox_y_pos + combobox_step * 2)
# 纬度所在列
label_lat_col = tkinter.Label(top, text="*纬度所在列:")
label_lat_col.place(x=left_padding, y=combobox_y_pos + combobox_step * 3)
combobox_lat_col = ttk.Combobox(top, state="readonly", values=["未选择"])
combobox_lat_col.place(x=left_padding + 100, y=combobox_y_pos + combobox_step * 3)
# 高度所在列
label_hei_col = tkinter.Label(top, text="高度所在列:")
label_hei_col.place(x=left_padding, y=combobox_y_pos + combobox_step * 4)
combobox_hei_col = ttk.Combobox(top, state="readonly", values=["未选择"])
combobox_hei_col.place(x=left_padding + 100, y=combobox_y_pos + combobox_step * 4)
# 描述所在列
label_desc_col = tkinter.Label(top, text="描述所在列:")
label_desc_col.place(x=left_padding, y=combobox_y_pos + combobox_step * 5)
combobox_desc_col = ttk.Combobox(top, state="readonly", values=["未选择"])
combobox_desc_col.place(x=left_padding + 100, y=combobox_y_pos + combobox_step * 5)

# 高度模式
label_altitude_mode = tkinter.Label(top, text="高度模式:")
label_altitude_mode.place(x=left_padding, y=combobox_y_pos + combobox_step * 6)
combobox_altitude_mode = ttk.Combobox(top, state="readonly")
combobox_altitude_mode.place(x=left_padding + 100, y=combobox_y_pos + combobox_step * 6)
combobox_altitude_mode['values'] = ["紧贴地表", "相对地表", "海拔高度", "依附模型"]
# 属性拼接
checkbox_desc_join_var = tkinter.IntVar()
checkbox_desc_join = tkinter.Checkbutton(top, text="属性拼接", variable=checkbox_desc_join_var, onvalue=1, offvalue=0)
checkbox_desc_join.select()
checkbox_desc_join.place(x=left_padding + 120, y=combobox_y_pos + combobox_step * 7)
# 包含首行,默认处于不选中状态
checkbox_include_first_line_var = tkinter.IntVar()
checkbox_include_first_line = tkinter.Checkbutton(top, text="包含首行", variable=checkbox_include_first_line_var,
                                                  onvalue=1,
                                                  offvalue=0)
checkbox_include_first_line.place(x=left_padding, y=combobox_y_pos + combobox_step * 7)

combobox_name_col.current(0)
combobox_lon_col.current(0)
combobox_lat_col.current(0)
combobox_hei_col.current(0)
combobox_desc_col.current(0)
combobox_altitude_mode.current(0)
# 导出按钮及取消导出按钮
button_excel_to_kml = tkinter.Button(top, text='导出', command=export_excel_to_kml, bg="#169BD5")
button_reset = tkinter.Button(top, text='重置', command=reset_everything)

button_reset.place(x=660, y=540, width=120, height=50)
button_excel_to_kml.place(x=530, y=540, width=120, height=50)
6.2 读取Excel文件
对于Excel文件的解析,这里采用了openpyxl库
核心用于读取Excel文件,遍历工作表(sheet),按行、列遍历单元格,获取单元格内容。
并根据读取到的内容动态更新界面对象,如下来列表的可选项,Excel信息展示
具体代码如下:
python
# 选择kml文件
def select_excel_file():
    excel_file_path = filedialog.askopenfilename(
        title="选择excel文件",
        filetypes=(("excel文件", "*.xlsx | *.xls"),)
    )
    if excel_file_path == "":
        return
    # 把选择的文件路径的名称,展示到输入框内
    url_value.set(excel_file_path)
    # 加载数据,并获取数据的基本信息,展示出来
    excel_info = "你选择的文件【 "
    excel_file_name = os.path.basename(excel_file_path)
    # 获取文件体积,并自动转换体积单位为M或者kb
    excel_file_size = os.path.getsize(excel_file_path) / 1024
    excel_file_size_unit = "kb"
    if excel_file_size > 1024:
        excel_file_size = excel_file_size / 1024
        excel_file_size_unit = "M"
    # 体积大小保留一位小数
    excel_file_size = round(excel_file_size, 1)
    excel_info = excel_info + excel_file_name + "】体积" + str(excel_file_size) + excel_file_size_unit
    label_excel_info.config(text=excel_info)
    top.update()
    # 初步解析Excel(行数)
    try:
        global my_workbook
        my_workbook = openpyxl.load_workbook(filename=excel_file_path)
        excel_info = excel_info + "\n文件打开成功"
    except:
        excel_info = excel_info + "\n文件打开失败"
        return
    excel_info = excel_info + "\n文件中包括如下" + str(len(my_workbook.sheetnames)) + "个工作表:"
    label_excel_info.config(text=excel_info)
    top.update()
    # 遍历所有工作表
    current_sheet_num = 1
    for current_sheet_name in my_workbook.sheetnames:
        my_currentsheet = my_workbook[current_sheet_name]
        # 获取该工作表的行数、列数,并显示到表格信息栏中
        excel_info = excel_info + "\n" + str(current_sheet_num) + ".【" + current_sheet_name + "】工作表包含" + str(
            my_currentsheet.max_row) + "行" + str(my_currentsheet.max_column) + "列数据"
        label_excel_info.config(text=excel_info)
        top.update()
        current_sheet_num += 1

    # 使用第一个sheet里面的内容,对界面控件赋值
    sheet_first = my_workbook[my_workbook.sheetnames[0]]
    combobox_value = ["未选择"]
    global field_value
    field_value = []
    for first_sheet_cell_col in range(sheet_first.max_column):
        current_cell_value = sheet_first.cell(row=1, column=first_sheet_cell_col + 1).value
        combobox_value.append("第" + str(first_sheet_cell_col + 1) + "列(" + str(current_cell_value) + ")")
        field_value.append(str(current_cell_value))
    combobox_name_col['values'] = combobox_value
    combobox_lon_col['values'] = combobox_value
    combobox_lat_col['values'] = combobox_value
    combobox_hei_col['values'] = combobox_value
    combobox_desc_col['values'] = combobox_value
6.3 构建矢量对象保存为KML
此处的核心是:
1.新建KML图层(一个空文件即可),获取Layer对象。
2.根据解析出的经纬度信息,构建marker对象,并设置marker的图标、文字的样式风格
3.把excel的列按照html的样式构建出marker的属性对话框内容
python
def export_excel_to_kml():
    try:
        type(my_workbook)
    except NameError:
        print("my_workbook未定义")
        messagebox.showwarning("提醒", "请先选择excel文件再导出")
        return
    # 获取下拉列表的选择,如果经度、纬度、名称未选择,直接return
    lon_col_id = combobox_lon_col.current()
    lat_col_id = combobox_lat_col.current()
    hei_col_id = combobox_hei_col.current()
    name_col_id = combobox_name_col.current()
    desc_cold_id = combobox_desc_col.current()
    if lon_col_id == 0 or lat_col_id == 0 or name_col_id == 0:
        messagebox.showwarning("注意", "经度所在列,纬度所在列,名称所在列必选。")
        return
    # 选择kml文件的保存位置
    kml_file_path = filedialog.asksaveasfilename(
        title="选择kml文件保存的名称",
        filetypes=(("kml文件", "*.kml"),),
        defaultextension='.kml'
    )
    if kml_file_path == "":
        return
    # 创建一个空的kml文件,并添加到Globe,如果选择了一个已存在的KML文件会直接覆盖
    kml_file_empty = open(kml_file_path, mode='w')
    kml_file_empty.write("")
    kml_file_empty.close()

    # 添加图层到Globe
    # TXLayer:current_layer
    current_layer = globe.AddLayer(kml_file_path)
    # 构建的marker个数
    feature_num = 0
    # 按行解析数据
    sheet_first = my_workbook[my_workbook.sheetnames[0]]
    # 遍历每一行
    for cell_row in range(sheet_first.max_row):
        if cell_row == 0 and int(checkbox_include_first_line_var.get()) == 0:
            print("不包含首行")
        else:
            current_row_value = []
            # 为要素设定一个带样式的属性对话框
            current_desc = '<table width="600px" border="0" cellspacing="1" cellpadding="4" bgcolor="#cccccc"  ' \
                           'align="center"><tr><td width="40%" style="background:#e9faff;text-align:center;color: ' \
                           '#255e95;font-weight: bold;">字段名称</td><td width="60%" ' \
                           'style="background:#e9faff;text-align:center;color: #255e95;font-weight: ' \
                           'bold;">字段值</td></tr>'
            # 遍历每一列
            for cell_col in range(sheet_first.max_column):
                current_row_value.append(str(sheet_first.cell(row=cell_row + 1, column=cell_col + 1).value))
                current_desc += '<tr><td  style="background:#f2fbfe;text-align:center;">' + field_value[
                    cell_col] + '</td><td  ' \
                                'style="background:#f3f3f3;text-align:left;">' + str(
                    sheet_first.cell(row=cell_row + 1, column=cell_col + 1).value) + '</td></tr>'
            current_desc += '</table>'
            try:
                # 获取坐标信息
                lon_value = float(current_row_value[lon_col_id - 1])
                lat_value = float(current_row_value[lat_col_id - 1])
                hei_value = 0
                if hei_col_id != 0:
                    hei_value = float(current_row_value[hei_col_id - 1])
                name_value = current_row_value[name_col_id - 1]
                # 构建marker对象
                marker = TXGeoMarker()
                # 构建点对象
                position = TXPoint(lon_value, lat_value, hei_value)
                # 给marker设置位置坐标
                marker.SetPosition(position)
                # 定义marker的样式(保持默认可以不定义style)
                current_style = TXMarkerStyle()
                # 设置marker图标的路径、对齐方式、缩放比例
                current_style.SetIconPath("C:\\Users\\Tuxin\\Desktop\\line_red.png")
                current_style.SetIconAlign(AlignMode_TopCenter)
                current_style.SetIconScale(5.0)
                # 设置marker的文字样式(对齐方式)
                current_text_style = TXTextStyle()
                current_text_style.SetAlign(AlignMode_TopCenter)
                current_style.SetTextStyle(current_text_style)
                marker.SetStyle(current_style)
                # 设置显示的文本
                marker.SetText(name_value)
                # marker的名称,可根据名称来检索对象,一般建议和显示文本保持一致
                marker.SetName(name_value)
                # 设置marker的属性字符串
                marker.SetDescription(current_desc)
                # 添加marker到图层
                current_layer.AddMarker(marker)
                # 刷新地球(该方法会对地球上的要素进行重绘,确保修改的样式及时渲染出来)
                globe.Refresh()
                feature_num += 1
                # 每转换20个要素,刷新一下界面,防止界面卡死
                if cell_row % 100 == 0:
                    excel_info = label_excel_info['text'] + "\n已转换" + str(cell_row) + "行数据"
                    label_excel_info.config(text=excel_info)
                    top.update()
                print("当前正在处理:" + str(cell_row))
            except:
                print("当前异常行:" + str(cell_row))
    current_layer.Save()
    excel_info = label_excel_info['text'] + "\n已转换" + str(sheet_first.max_row) + "行数据"
    label_excel_info.config(text=excel_info)
    top.update()
    messagebox.showwarning("提醒", "Excel中数据已全部转为kml,共计" + str(feature_num) + "个对象")